Email Us
nicoledai@sundi-wpc.com
Call us
+86-13357804798

Installing a Wood-Plastic Composite (WPC) pergola differs slightly from working with traditional lumber. Because WPC is an engineered product, it possesses unique thermal expansion characteristics and structural weight dynamics.
For contractors, builders, and distributors, partnering with a manufacturer that provides a complete, engineered system is key to a smooth installation. Premium systems, such as those engineered by Sundi WPC, utilize smart interlocking components and internal reinforcements to simplify the process while ensuring maximum structural integrity.
Here is the definitive step-by-step installation guide for a professional WPC pergola setup.
Before starting, ensure you have standard woodworking tools: a circular saw (with a carbide-tipped blade), a power drill, a level, and safety gear.
Critical Note on WPC Weight: WPC components are heavier and denser than natural wood. Ensure your concrete footings or decking substructure can support the load. Sundi's engineering team recommends verifying local building codes for heavy-duty outdoor structures.
The foundation dictates the structural integrity of the entire pergola.
1. Mark the Layout: Use strings and a leveling tool to ensure a perfect square.
2. Secure the Post Anchors: Fix heavy-duty steel or aluminum internal post supports onto the concrete slab using expansion bolts.
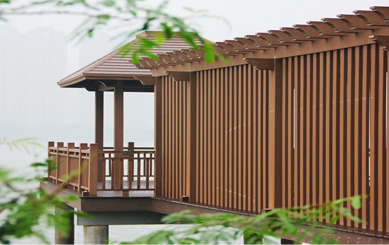
3. Sleeve the WPC Posts: Slide the hollow WPC post sleeves over the internal metal supports. Sundi WPC pergola systems feature heavy-walled post profiles designed to seamlessly encapsulate steel cores, providing massive load-bearing strength with a flawless composite exterior.
The main beams support the weight of the overhead louvers.
1. Positioning: Clamp the primary WPC beams to the top of the posts at the designated height.
2. Fastening: Drill pilot holes through both the WPC beam and the internal metal post support. Secure them using heavy-duty stainless steel bolts, nuts, and washers to prevent rust streaks over time.
The top blades or louvers create the shading effect.
1. Spacing: Measure equal intervals along the main beams according to your design plans (typically 30cm to 40cm apart).
2. Securing with Hidden Brackets: One of the main advantages of sourcing from Sundi WPC is their proprietary, hidden connector system. Secure the brackets to the beams first, then drop the WPC rafters into place for a clean, screw-free aesthetic look.
3. Allow for Thermal Expansion: WPC expands and contracts slightly with temperature changes. Never tightly jam the ends of the rafters against a solid structure; always leave a 3-5mm expansion gap as specified in Sundi's installation manual. If you have similar outdoor structures already buckling due to tight clearance, you can read our pro contractor guide on how to fix WPC fence expansion issues for detailed trimming and spacing strategies.
1. Check the entire structure with a level to ensure no shifting occurred during fastening.
2. Install the WPC post caps and trim skirts provided in the Sundi kit to hide the base bolts and top openings, ensuring a clean, luxury finish.
By choosing a precision-engineered system from a trusted global supplier like Sundi WPC, contractors can drastically reduce on-site labor costs while delivering an outdoor shading solution built to last for generations.

 English